Posts

Copy components from one solution to another

Image
Copy components from one solution to another Many times, we need to copy components in Power platform from 1 solution to another. This blog will guide you on how we can copy components from one solution to another solution automatically instead of adding manually. Here in this blog, I am using 2 solutions (Solution A as source and Solution B as destination). Solution A contains Case table, and we will copy that table to Solution B) 1. Select component from Solution A which you want to move in Solution B and then click on Advanced option in header and then on Add to solution option. 2.  After clicking “Add to solution” option you will be prompted to select the destination solution (in my case I will select solution B).         3. Now click on Save.   4. After clicking on Save and once component is copied to destination Solution you will receive success notification as shown below.         5.  Now, verify your ...
Create a new lead on each form submission irrespective of the same lead exists in Dynamics 365 Marketing

Image
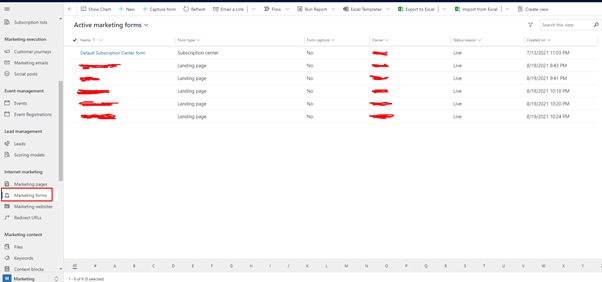
The Default behavior of Marketing form for lead creation in Dynamics 365 Marketing is when a lead is submitted by user from a website then system checks whether the same lead exists in Dynamics 365 Marketing, if yes, then it updates the existing lead with the new data that user has submitted but if no, then it creates new lead in the system. But what if we get a requirement to create a new lead on each form submission irrespective of the same lead exists in Dynamics 365 Marketing? This blog will help you to achieve the same. Go to Marketing forms in D365 CRM Marketing App as shown below. Open form record on which you want to make changes to allow lead creation for each form requested submitted by user and click on edit button in header. Now, click Summary Tab, under Content section changes value of Generate leads without matching field to Yes and if you want you can set purpose field value to Lead generation. Now, Save the changes. Congratulations, you have successfully achieved the ...

Disable external user registration in Power Apps Portal

Image
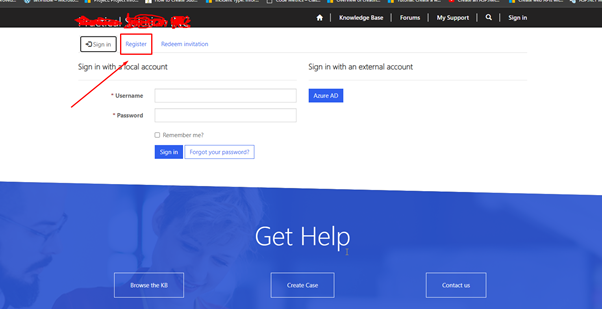
By default, on Sign In page we get new registration option in Power Apps Portal. But many times, we do not want external user to register on our Portal. Here is my blog that will guide you to disable registration of External user on Power Apps Portal. Login to https://make.powerapps.com and under Apps Section click on ellipsis of your Portal App. Now, Click on details. On details page, there is an Identity Provider Section click on Authentication settings (gear icon on the section). On Authentication settings form, disable open registration and click save. Now, go to Sign In page and you will find registration option is now disabled. Hope this helps!

Send note's PDF as email attachment using Power Automate

Image
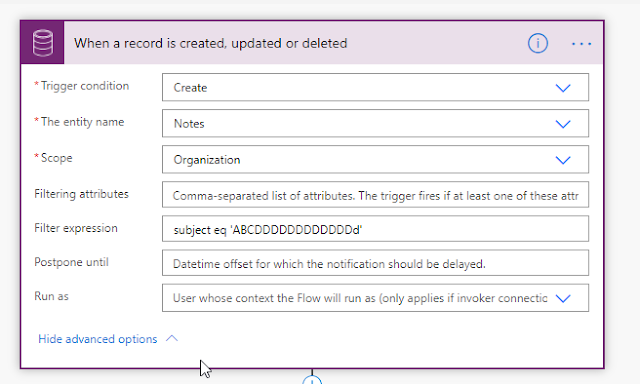
Many times, we may get requirement to send PDF attached in notes as Email to a person. This blog will guide you on how you can do the same. In this blog, we will trigger a flow on notes Entity when a note is created Steps: 1. Add 1 st step as when a record is created in notes entity(annotation) with filter expression as subject eq "ABCDDDDDDDDDDDDd           Note: “ABCDDDDDDDDDDDDd” is used to trigger a flow when subject field of note’s record is equal to " ABCDDDDDDDDDDDDd’. 2.  Send an Email to user with required details. Here an Important thing is to convert the document (Base 64 file content) in binary string i.e. (“ base64ToBinary(triggerOutputs()?['body/documentbody']) ” ) without conversion, the PDF will not work in email attachment. 3.  Now you have successfully able to send PDF as E-mail attachment. Hope this helps!

Make D365 CRM Entity as Read only

Image
Hi, this blog will guide you on how you can make an Entity as Read only in Dynamics 365 CRM. Steps : Ensure that the entity which you want to make read only is not already read only. In my case it is account entity and you can see it in not read only. Now, Open solution. Expand Entities node and click on Account. After clicking Accounts on right side you will see a general tab. In, General tab just scroll down and go to Outlook and Mobile section and ‘Tick’ Enable for Unified Client and then ‘Tick’ Read-only in Unified Client. Now save and Publish the solution. G o back to entity and check it is now read only. Hope this helps you out!

Convert an Array to comma separated string in Power Automate

Image
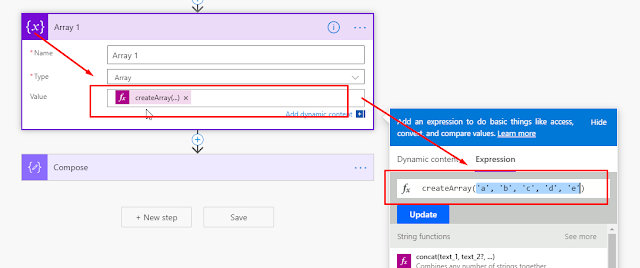
Many times when we have an Array in Power Automate and we want to make it comma separated string in such cases we use loop to iterate each element in an array and append comma, we can avoid this loop and create desired string by using Join function available in Power Automate. My blog will guide you how you can achieve the same. Note : I am using hard code array in my blog, but you can use dynamic array as well Steps: Initialize a variable of type array with [ 'a', 'b', 'c', 'd', 'e' ] as its element. Add a new Compose step and use join function ( join (variables('Array 1'),',') ) to make array a comma separated string as shown below. Join function accepts 2 parameters, first parameter as Array in my case its Array 1 (variable) and second parameter as delimiter in my case I passed ‘,’ as we want to make comma separated string but you can use any delimiter and create your own string. Now, save and execute the flow and check if it ...

IF function in Power Automate

Image
Many times, in Power automate we set a variable based on some condition and to achieve that, we use condition control action, but we can avoid using action and use If function instead. This blog will guide you on how you can use If function instead to using condition control action. Use Case: When an Account is created in D365 CE, Initialize the variable and set its value as description. If description is unavailable, then set value as NA. Steps: When an Account is created in D365 CE. Add a Compose action and enter if(equals(triggerOutputs()?['body/description'],null),'NA',triggerOutputs()?['body/description']) as expression in Input Field of connector. In above Step (2) it checks if description is null then set “NA” as output else set description as output. Initialize a variable of type string and set its value as Output of compose action. Create an Account and check if we get the desired result. Enjoy!

Send a notification on Microsoft Teams when a record is created or Updated or Deleted in D365 CRM using Power Automate

Image
Steps involved in Power Automate: Select trigger, in my case I used CDS connector (Current Environment) when a record is created, updated or deleted. Select trigger condition, in my case I used Update. Select entity name, in my case I used Opportunities. Select Scope, Organization. Add new step to flow. Search Microsoft Teams and select Post a message. Select Team where you want to post a message. Select Channel from team where you want to send a notification. Enter Message in message box. Click Save and check teams. Congratulations! You have successfully created the required flow Hope this helps!!!

Trigger an Email when account is created in D365 CRM using Azure Logic App

Image
Click here to see, how to create Azure Logic App Search for common data service and select trigger as When a record is created . Select Environment, Entity Name, Scope. Click on new step. Search office 365 outlook and click on Send an email . Now, fill in the required data. Once, all the details are filled in send email connector as shown above, click save. Now, create a new account record in D365 CRM. In my case, I created account with name Tejesh Enterprise . An email will be triggered to the person with the details specified in connector. Hope this Helps!

Create Azure Logic Apps

Image
Create Azure Logic Apps Login to https://portal.azure.com/ Search for logic app in search bar in top header. Click on Add. After clicking on Add, a new form opens. Select Subscription, here I selected Pay-As-You-Go. Select Resource group, here I created new Resource group with name AzureLogicAppLearning. Enter Logic App name in my case it is SendEmailOnAccountCreation. Select the location, here I selected Southeast Asia. Now, click Review + Create. After, clicking Create Deployment of app starts. Post deployment completion you will be redirected to App overview page. Congratulations!! You have successfully created Logic Apps and you can start using connectors.

Connect D365 CRM CDS Database From SQL Server

Image
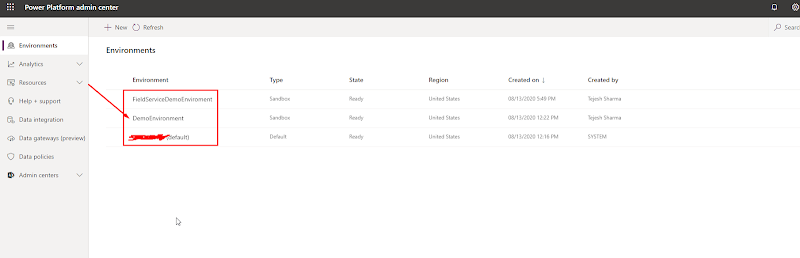
Connect D365 CRM CDS Database from SQL Server Many times, we feel like why I can’t access D365 CRM Database directly from MS SQL Server, so here is my blog that will guide you on how you can connect D365 CRM CDS Database using MS SQL Server. Steps to enable D365 CRM CDS Database to make it connect from MS SQL Server: Login to https://admin.powerplatform.microsoft.com/ using administrator credentials. In Environment section, click on your environment for which you want to enable D365 CRM CDS for MS SQL Server. (In my case I am clicking on DemoEnvironment as shown below.) When Environment opens click on settings in header. Settings page will open, Click on Product and then click on Features. When features Page opens enable TDS Endpoint (Preview) and click save. Now, we have successfully enabled D365 CRM CDS to connect it from MS SQL Server. Steps to Connect CDS Database from MS SQL Server: Open MS SQL Server. In connect to SQL Server Window enter Server name (It will be your D365 CRM UR...