Posts

Showing posts from September, 2020

Convert an Array to comma separated string in Power Automate

Image
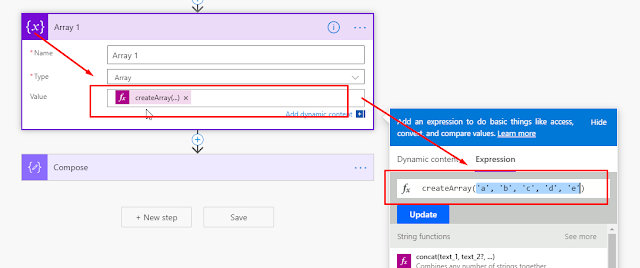
Many times when we have an Array in Power Automate and we want to make it comma separated string in such cases we use loop to iterate each element in an array and append comma, we can avoid this loop and create desired string by using Join function available in Power Automate. My blog will guide you how you can achieve the same. Note : I am using hard code array in my blog, but you can use dynamic array as well Steps: Initialize a variable of type array with [ 'a', 'b', 'c', 'd', 'e' ] as its element. Add a new Compose step and use join function ( join (variables('Array 1'),',') ) to make array a comma separated string as shown below. Join function accepts 2 parameters, first parameter as Array in my case its Array 1 (variable) and second parameter as delimiter in my case I passed ‘,’ as we want to make comma separated string but you can use any delimiter and create your own string. Now, save and execute the flow and check if it

IF function in Power Automate

Image
Many times, in Power automate we set a variable based on some condition and to achieve that, we use condition control action, but we can avoid using action and use If function instead. This blog will guide you on how you can use If function instead to using condition control action. Use Case: When an Account is created in D365 CE, Initialize the variable and set its value as description. If description is unavailable, then set value as NA. Steps: When an Account is created in D365 CE. Add a Compose action and enter if(equals(triggerOutputs()?['body/description'],null),'NA',triggerOutputs()?['body/description']) as expression in Input Field of connector. In above Step (2) it checks if description is null then set “NA” as output else set description as output. Initialize a variable of type string and set its value as Output of compose action. Create an Account and check if we get the desired result. Enjoy!

Send a notification on Microsoft Teams when a record is created or Updated or Deleted in D365 CRM using Power Automate

Image
Steps involved in Power Automate: Select trigger, in my case I used CDS connector (Current Environment) when a record is created, updated or deleted. Select trigger condition, in my case I used Update. Select entity name, in my case I used Opportunities. Select Scope, Organization. Add new step to flow. Search Microsoft Teams and select Post a message. Select Team where you want to post a message. Select Channel from team where you want to send a notification. Enter Message in message box. Click Save and check teams. Congratulations! You have successfully created the required flow Hope this helps!!!

Trigger an Email when account is created in D365 CRM using Azure Logic App

Image
Click here to see, how to create Azure Logic App Search for common data service and select trigger as When a record is created . Select Environment, Entity Name, Scope. Click on new step. Search office 365 outlook and click on Send an email . Now, fill in the required data. Once, all the details are filled in send email connector as shown above, click save. Now, create a new account record in D365 CRM. In my case, I created account with name Tejesh Enterprise . An email will be triggered to the person with the details specified in connector. Hope this Helps!

Create Azure Logic Apps

Image
Create Azure Logic Apps Login to https://portal.azure.com/ Search for logic app in search bar in top header. Click on Add. After clicking on Add, a new form opens. Select Subscription, here I selected Pay-As-You-Go. Select Resource group, here I created new Resource group with name AzureLogicAppLearning. Enter Logic App name in my case it is SendEmailOnAccountCreation. Select the location, here I selected Southeast Asia. Now, click Review + Create. After, clicking Create Deployment of app starts. Post deployment completion you will be redirected to App overview page. Congratulations!! You have successfully created Logic Apps and you can start using connectors.